12.25.2015

***Merry Christmas***


Merry Christmas to you!!!  
It has been a very busy December getting ready for my kids' favorite holiday. 
 I've had so much fun sharing some of my favorite patterns and gifts to make the past few weeks.  
You can find a recap and all the tutorial links [HERE]
Handmade Holidays are the best : )  
I was able to finish up a few more gifts for my family which I will share today.

My mom has been doing some embroidery and I wanted to make her a few useful and cute items to keep her embroidery supplies at hand.  I made the pouch big enough to hold a small embroidery hoop with inside pockets for storing notions and supplies.  The dress on the pouch is from my Vintage Dresses pattern reduced to 6" tall.


The needle book has a paper pieced design with my favorite "Kerchief Girls" print as the focal point.


Two front pleated pockets hold embroidery thread.
My favorite feature is this cute little scissor holder.


My boys both have MP-3 players and are always misplacing them!  I thought it would 
be fun to make a gadget pouch so they could keep their player and earphones in one place.


It was fun to put together a boy colored palette of blues, golds and browns.


Every Christmas my boys get a new stuffed animal in their stocking.  I found these cute Husky dogs but they needed a little something to make them extra special.  I made each a hand knit scarf and think they look extra adorable.


Wishing you Love, Peace and Happiness and a 2016 filled with Joy!

xo
Charise


12.16.2015

Handmade Gifts ~ Vintage Kitchen Hot Pads


It is not too late to stitch up some gifts in time for the holidays!  This sweet potholder set is made
with my vintage bowls and vintage apron pattern. 

I used my round potholder tutorial which you can find [HERE]
This pattern is perfect for an orphan quilt block 8" or smaller. 
 I embellished the back pockets with cotton lace and ric rac. 
 It would also be fun with a self fabric ruffle or some whimsical ribbon trim.


Include a pair of color dipped kitchen utensils and you have the perfect gift for you favorite cook!


You can find the Vintage Bowls and Apron Patterns in my Etsy shop [HERE] and my Craftsy shop [HERE]


xo
Charise


12.10.2015

Handmade Gifts ~ Apple and Pear Potholder


Hello and Happy Thursday.  Only 15 more days until Christmas!  Yikes.....
I am working on more Holiday Sewing and thought I would share a quick make 
that is a wonderful gift.


These round potholders are made with my free apple and pear paper piecing pattern which you can find [HERE].
The round potholder tutorial can be found [HERE].  
I am pairing them with a fun set of 
colored dipped bamboo spoons I found at a local kitchen wares store.
I found these on Etsy which are adorable!

If you missed any of my previous Handmade Gift posts, You can find them [HERE]

Wishing you Happiness and Peace during this hectic Holiday Season!

xo
Charise


12.04.2015

Handmade Gifts ~ Citrus Pouch


Happy Friday!
Today I am sharing another handmade gift idea for my Handmade Holidays series.


I designed the citrus pouch for the Liberty Craft Blog.  
It is the perfect size for a pencil pouch.
I have shown it here with a lovely, colorful Moleskin Sketch book and some fun colored pencils.
Another perfect gift for your creative friends and family.


It is also the perfect size for portable sewing supplies or a make-up pouch.


The fabrics used in the pouches pictured are from Liberty of London. They are a lightweight cotton lawn, but any quilting weight cotton print or solid would work nicely, too.

You can find the pattern and instructions on the Liberty Craft Blog [HERE]

  Happy Sewing
xo
Charise

12.02.2015

Sewing Machine Review ~ Janome CoverPro 1000CPX


A few months back I purchased a Coverstitch machine from Pink Castle Fabrics ~ the Janome CoverPro 1000CPX


A Coverstitch is a sewing machine that has multiple stitches mainly used for hem finishing on knit garments. 
It can be used on Sleeve Hems, Bottom Hems and Necklines.

I love to sew knits but I am perennially disappointed with the hems on my garments made with a straight stitch home sewing machine.  They look nice but aren't stretch enough for knit fabrics. 

If you look at a purchased knit garment, you will notice the double or triple needle stitch used to finish hems and sometimes necklines on garments.

The Janome machine has options for three different stitches:

single stitch or chain stitch 
double needle coverstitch 
triple needle cover stitch.

I decided to try it in a few different applications ,other than hems, which you can see below.


 I used the double needle coverstitch to stitch down an elastic waistband.
The machine can handle multiple layers of fabric.  This waistband has five layers of knit fabric plus elastic and it sewed like a dream.


This nightgown has lace that is applied on the top edge using the double needle coverstitch.  I love the way it turned out.  It is a nice clean finish with plenty of stretch.


The machine comes with a presser foot that is solid metal.  I had lots of trouble seeing where the needles were stitching.  So much, that I did a bit of research for a solution before using the machine again. 
 I found a partially transparent foot (pictured above) that allows you to see where you are stitching.  
I highly recommend it.  It is a bit spendy but worth the extra $.
You can find the foot [HERE]


Another great attachment is the Adjustable Seam Guide.
The Instruction Manual advises marking the hem width on the right side of the garment.
You then stitch on the line.
The seam guide can be set to the edge of the fold of the hem so you can skip the marking step.

To use the ADJUSTABLE SEAM GUIDE follow these steps:
1. Fold the hem to the wrong side, the desired width. Press in place.
*If your knit is having a hard time keeping a press, spray some Fabric Spray Starch on the fabric.*
2. Set the seam guide to the edge of the folded hem.
3. With the right side of you garment facing you, stitch your hem.

A FEW MORE TIPS:
1) Keep the instruction manual handy. 
You will need it for machine basics, threading, and tension information. 
  
2) Keep stitch sample for different fabrics and stitches.
I decided to attach mine to the Instruction manual so I wouldn't lose them : )

I hope this review was helpful.  If you like to sew knits, I highly recommend this machine to give your garments a professional finish.

If you have any specific questions, please leave a comment and I will reply on the blog.

xo
Charise


12.01.2015

~~~November~~~


Sewing this pouch for my mom with my Vintage Dresses pattern.

My Diamond Patchwork Purse in Stitch Winter 2016.  

Carved another block from Design, Carve, Print Class. More details [HERE]

Made a purse from my first block print from the Design, Carve, Print Class


Making progress on my Farmer's Wife Quilt

Loving this knit top and plan to make more : )

Playing with my new coverstitch machine and will share a review this month.

Finished my blocks for Amy's Maker Quilt and even mailed the package!

Shared some Free makes and Patterns just in time for Holiday Gift Giving


Have a lovely 1st day of December!!!

xo
Charise

11.27.2015

Holiday Sales at Charise Creates & Fat Quarter Shop

Wishing you a wonderful day after Thanksgiving to all my U.S. peeps : )

This is a quick post to share a sale in my Etsy Shop ~ Charise Creates.
20% off with the code thankful20.  This is for all items in my shop.
Sale lasts until end of day Sunday.


If you happen to purchase a pattern from my shop and need fabric, Fat Quarter shop is having a Black Friday Sale.

They have 25% OFF all orders from Friday, November 27 until Saturday, November 28 at Midnight CSTExcludes purchases of gift cards.  No code necessary.

xo
Charise

11.25.2015

Handmade Gifts ~ Good Night Nightie


Today I am going to share a night gown I designed for Stitch Beautiful Bedrooms.
Another gift for a special gal in your life.

The neckline has a pretty ruffle detail made with elastic thread.
The armholes are bound with self fabric binding that also creates the shoulder straps.


A perfect night gown made in a lightweight cotton voile, it would be equally lovely made in a drapey silk or rayon.
The hem has a pretty lace trim detail.


A lovely gift paired with a pretty scented soap.

You can find the FREE pattern on the Sew Mama Sew website [HERE]

Happy Holiday Sewing!
xo
Charise

11.24.2015

Handmade Gifts ~ Lavender Pinwheel Sachet Tutorial


Today I am going to share a gift that would be perfect for a special lady in your life ~ Mother, Best Friend, Sister.....


The sachet is based on a coaster pattern that I designed for RJR Fabrics Supreme solids blog hop.  
I modified the pattern a bit to make a lavender sachet.  
It has a hanging loop so you can tuck it in a drawer, under your pillow or hang from a hanger in your closet.


It is also a fun little gift to pop into a stocking.
This is a perfect gift paired with a beautifully scented candle ~  I found this candle at a local gift shop.


I used Liberty fabrics for this sachet.  Since it takes such little fabric, it is a great way to use up some large scraps of fabric.

Lavender Pinwheel Sachet Tutorial

Supplies :
1 - 4" square background fabric 
1 - 4" Square yellow print fabric 
2 - 1 1/2" x 4 1/2" strips print fabric
2 - 1 1/2" x 6 1/2" strips print fabric
1 - 6 1/2" square solid or print fabric for backing
9" - 1/4" - 1/2" wide ribbon
1 Button
Dried Lavender Florets (Mine came from my garden.  You can also buy lavender florets online.  My favorite online store is Pelenduba Lavendar which is located on San Juan Island in Washington State)

Matching Thread
Rotary Cutter and self healing mat
Acrylic ruler

*All seams are 1/4"*

Follow the directions for the Pinwheel coaster - Step 1 - 6 [HERE]

Step 7

Baste the ribbon the the top center of the front sachet right sides ribbon to right side sachet.

Step 8

Place the front sachet right sides together with the 6 1/2" square.


Stitch around the perimeter leaving a 2" opening at the bottom.
Clip corners.
Press the seams open.  Turn right side out and press 

Step 9


Stitch around the border leaving a 2" opening at the bottom.

Step 10

Make a small funnel with a 4" square of paper.
Fill the center of the sachet with the florets. 

Step 11


Stitch the opening between the border and pinwheel center closed.
Slip stitch the opening in the outer border.

Step 12


Stitch the button on the center of the sachet using a backing button on the 
wrong side. 


Enjoy your beautiful fragrant sachet : )

Happy Sewing
xo
Charise


11.22.2015

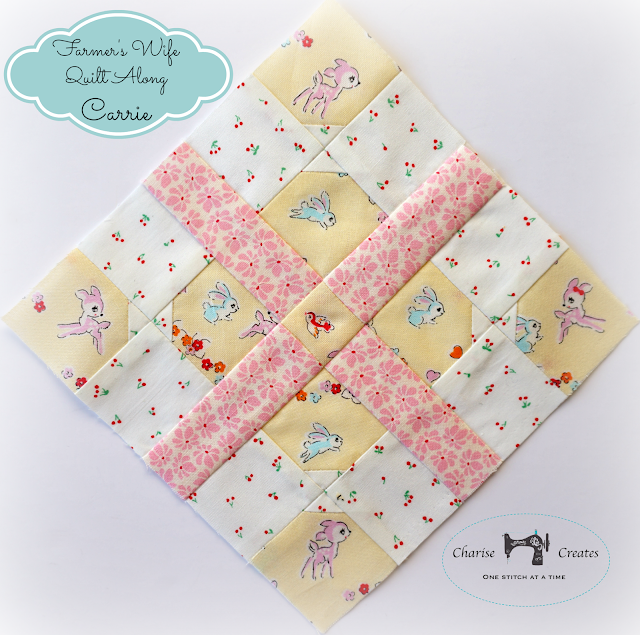
Farmer's Wife Quilt Along - Carrie


Thanks for stopping by!  It is my stop (again) on the Farmer's Wife 1930's Quilt Along hosted by Kerry at Very Kerry Berry.
This week I am sharing my version of the block Carrie.
Carrie is the name of my maternal grandmother.  I have such fond memories of 
spending time with her when I was a child.  
We would play "Beauty Shop" and have tea parties together.

One of my fondest memories is when we shopped for fabric for a purse that she was making for me.  I vividly remember the pink and green floral I picked - very much of the era - 1970's.
She was a big influence in my love of sewing.

[ Left to Right] My Grandmother Carrie, Great Grandmother Bertha and My Mother Ann,  at the Yakima Farm House
Carrie wasn't a farm girl - definitely a city girl like me : )
She grew up in the city of Chicago, Illinois and moved to Seattle in the early 1930's. 
Her parents, August and Bertha, owned a farm in the Eastern part of Washington State in a town called Yakima.
My mom, Ann, shares fond memories of her times spent there every summer.


This block was a fun one to make and, of course, I couldn't resist fussy cutting the small squares.
The fabrics used for this block are:
Bunny and bird print from Lecien, Tiny Cherry print from Sevenberry Fabrics,  and Pink Floral from Windham Fabrics "feedback" Inspired by American Jane


The Carrie block is a straight forward one to make.
I did a little planning this time and cut all the fussy cut motifs at the same time.
First I arranged the pattern.  Second I drew arrows showing the direction of the print.
I then cut the squares for the block.
It was a great way to keep the pieces in order and made it a fast block to stitch together.


Be sure to tag your Farmer's Wife block on Instagram with the hashtag #fw1930sqal
I have enjoyed seeing everyone's blocks on Instagram!

Happy Sewing
xo
Charise